Our Print Cloud solution features unique ways to order your print products globally. However, most apps are limited to stationary equipment that only has a single PDF. Google Forms allows you to order products with multiple PDFs!
This article describes in detail how to create a Google Form that allows you to order multi-PDF products such as books and brochures.
The procedure consists of two steps. First, create a Google Form in your Google Drive & second, build a Zap that reads information from the Google Form to submit your print job.
Step 1: Google Form
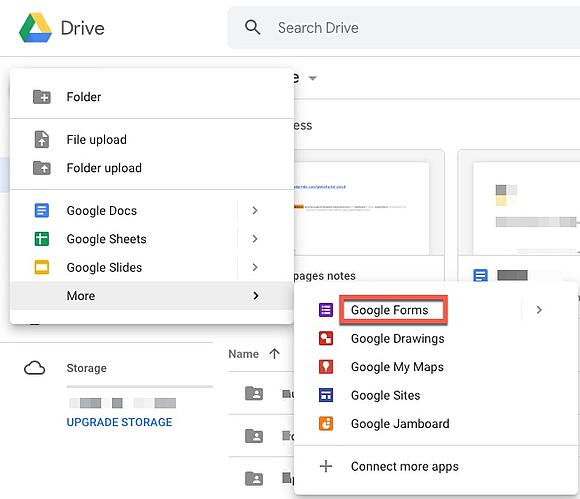
- First, we want to create the Form that will be used for uploading our PDF files. Head to your Google Drive & create a new Google Form as illustrated below.
- In this article, we will create a Google Form for uploading two PDF files. One for the cover of a book, and one for the page block of the book.
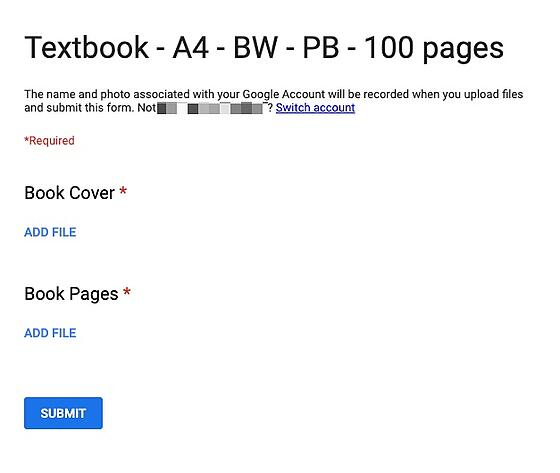
Please note that you need to create a unique Form for each Zap, meaning that each Form is designated for one type of product! In this example, we will create a Form for ordering Textbooks in black-and-white, size A4, paperback, and 100 pages.
In your Form, select File upload as the question input type.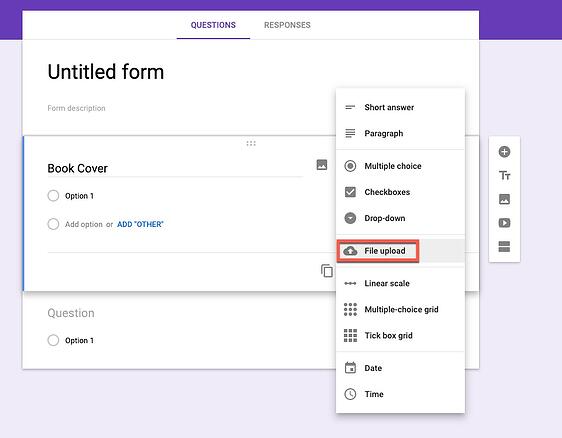 Name the Question appropriately such that you cannot make any mistakes with uploading the right files to the Form. The Cloudprinter.com platform only accepts PDF files, hence it is convenient for you to set the only accepted file type to PDF. You can adjust the Maximum file size to your own preference. To minimize the chance of mistakes, we recommend making all questions Required.
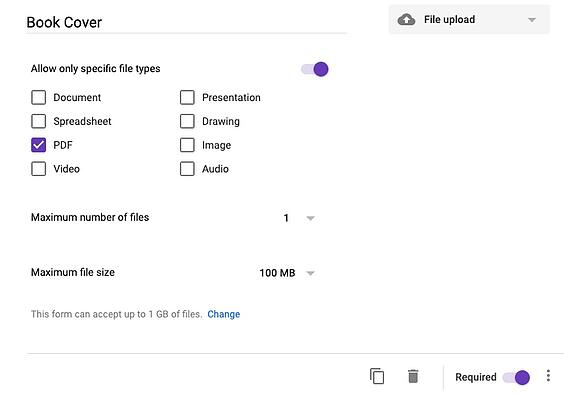 Repeat this procedure with a second question. This question will be used for uploading your page block.
 - We highly advise you to name your Form appropriately to keep things clean and organized for yourself and your customers.
Below you will find an example of how your Google Form should now look like.
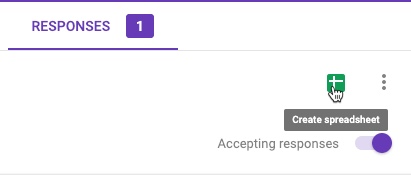
- For Zapier to be able to 'read' the input of your Google Form, now click on RESPONSES at the top of your Form. In this window, you will find the Google Sheets icon. Click it to create a spreadsheet that keeps track of all responses to your Form.
 You can choose to create a new spreadsheet or to select an existing spreadsheet, choose as you like. Now click CREATE.
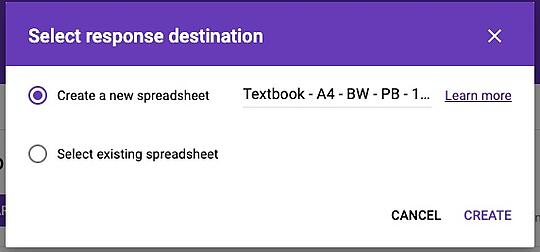
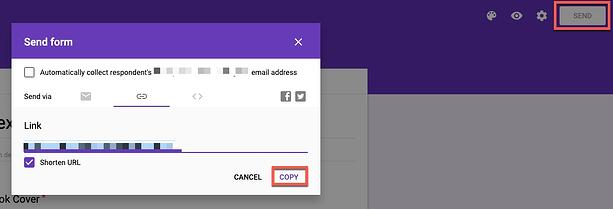
- To set up your Zap in Zapier, you need to have at least one response on the form that you just created. Go to Send in the top-right corner, open the sharing link, copy this link in a new tab of your browser and fill in the form with example documents.
- If you followed all steps provided above, your form will now look like this. Upload example PDFs for both questions and click SUBMIT.
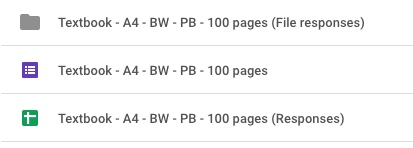
- Please now head back to your Google Drive. Next to your Google Form, there will now be two extra files. A folder for saving the uploaded PDF files and a spreadsheet for keeping track of the responses.
Step 2: Zapier
- Go to the Marketplace in your Dashboard. Find Zapier (your need to be subscribed to the Print Cloud product plan - find out more about our product plans here), activate it, and click the link provided in the description.
- Log in to your Zapier account or create a new account. Once you're logged in, you are ready to create a Zap! Click Make a New Zap.

- First, select your Trigger app. This is the application that will Trigger your Action in the next step (creating an order at Cloudprinter.com). Search for, and select Google Forms.

- Login to your Google account and proceed.
As Trigger, we will use New Response in Spreadsheet. This simply means that you can place an order by submitting a response to the Google Form that we've just created.
In this article, we will create an example Zap for ordering textbooks in black-and-white, size A4, paperback, and 100 pages.
All of our products and configurations can be found in this article.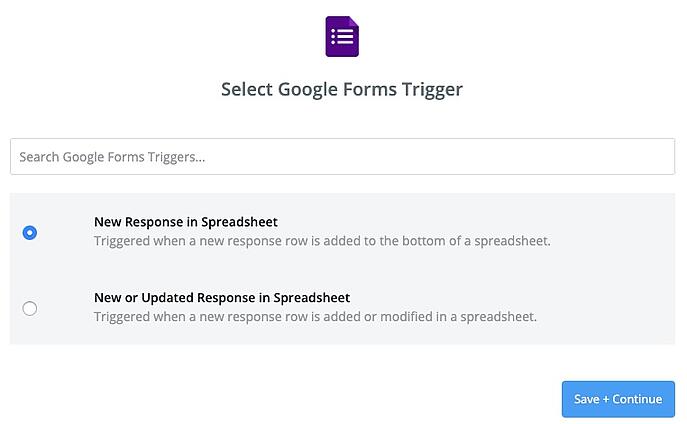
- Once you click Save + Continue, you are asked to set up your Google Forms Response spreadsheet. Browse your Google Drive and select the spreadsheet related to the Google Form that we created in Step 1. Also, select the Worksheet.
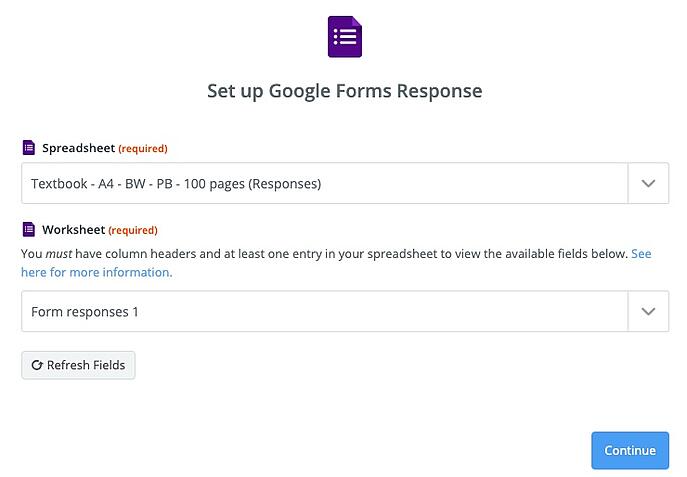
- Click Continue. To configure and test out the Trigger, Zapier wants you to upload a test response to your Google Form. Zapier will automatically wait 3 minutes for you - so you have enough time to upload a sample response to the Form (if you haven't done so already in Step 1).
- Great! You have now set up your connection to your Google Form! Well, that was easy, right? On to the next step.. Click Add one now! to add an action to your trigger.

- Before we set up our connection to Cloudprinter.com, we need to format the data that Zapier reads from our Google Form Trigger that we configured in Steps 1-7 before.
The reason for formatting the input is that Cloudprinter.com needs a download URL in order to download your file automatically. As Google Forms provides a view URL by default, we need to format the input a little.
Just follow the steps provided below, and we will describe them step-by-step for you.
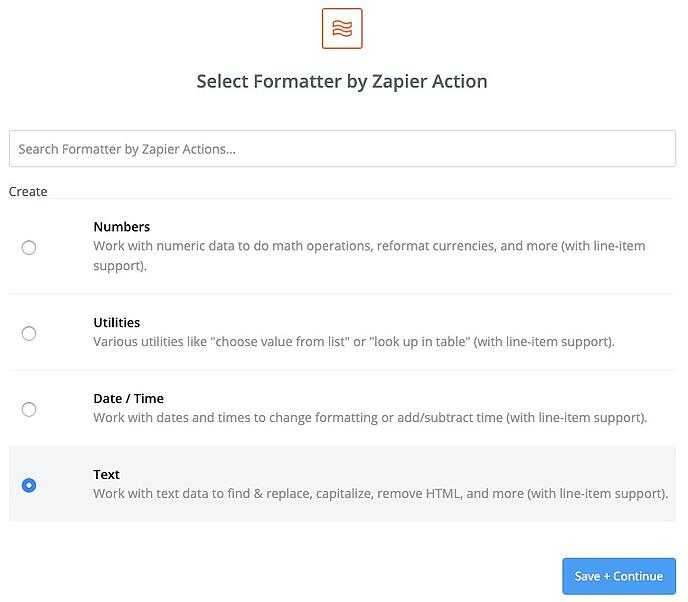
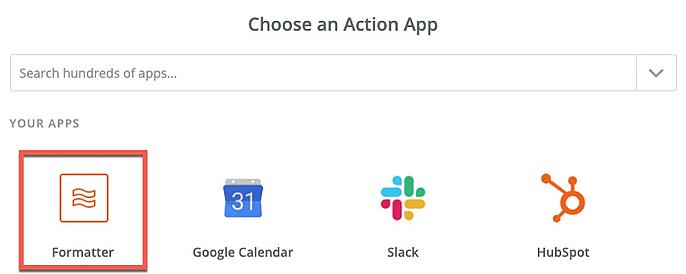
First, select the Formatter from Zapier as your Action.
- In the next step, choose Text. Click Save + Continue.
- The Transform method is Split Text. This method splits your view URL into the web address and the file ID.
As for Input, select the first PDF file that is uploaded to your Form. In our case, this will be the book cover.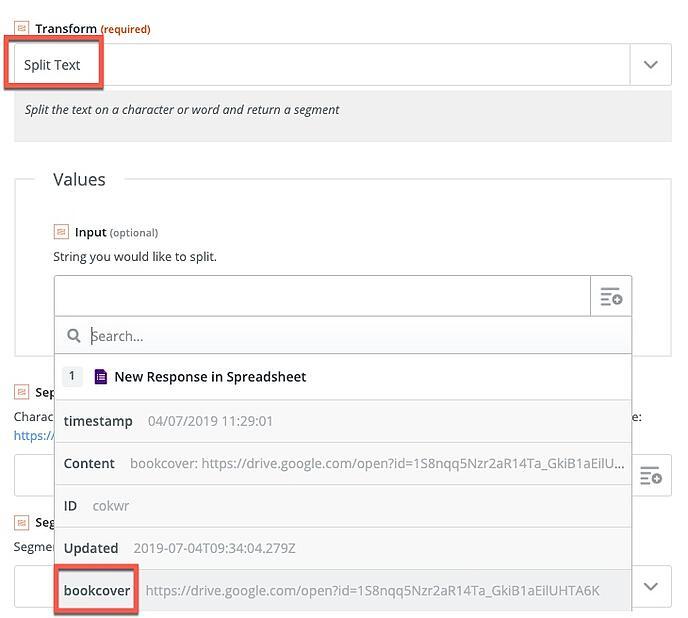
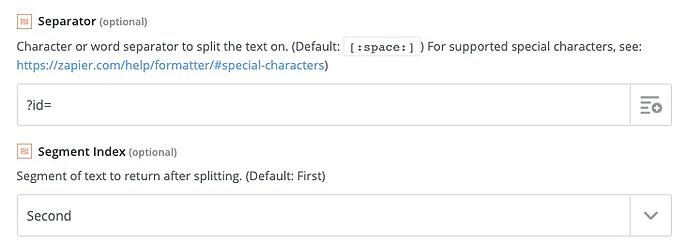
- To separate the web address from the file ID, write the following as Separator and set the Segment Index to be Second as illustrated below.
?id=
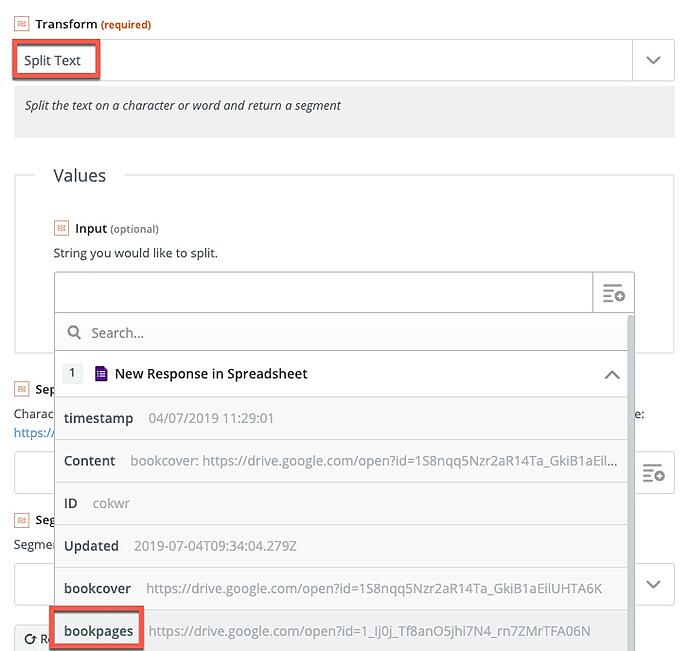
- Click Continue. As our order will consist of two separate PDF files, we need to repeat the previous procedure once more. Again, select Formatter as your second Action.
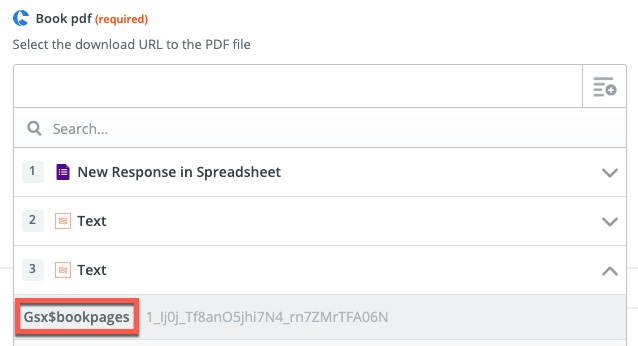
- Now, choose Split Text and select book pages. The Separator and Segment Index are the same as in Step 11.
- Great! You have now formatted your view URL such that we now have the File ID available! Well, that was easy, right? On to the next step.. creating your order! Click Add one now to add a third action to your Zap.

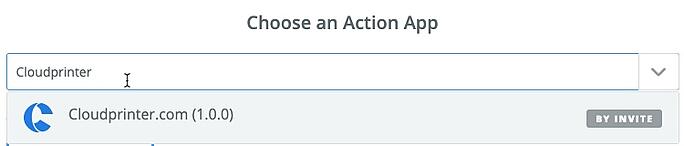
- Please, select Cloudprinter.com as your third, and last, Action.
- Click continue and Connect an Account using the Open Authorization window that will pop up. You can use your common Cloudprinter.com details to connect your account.
Next is to select the actual Action that you want Zapier to perform when a response is uploaded to your Google Form. Select Create Order and Continue.
- A long-form will be shown on the next page if you click Save + continue. Most fields will speak for themselves. However, there are some fields that may need additional explanation.
Product: configure your product such that it will exactly match the PDFs that will be uploaded using the Google Form.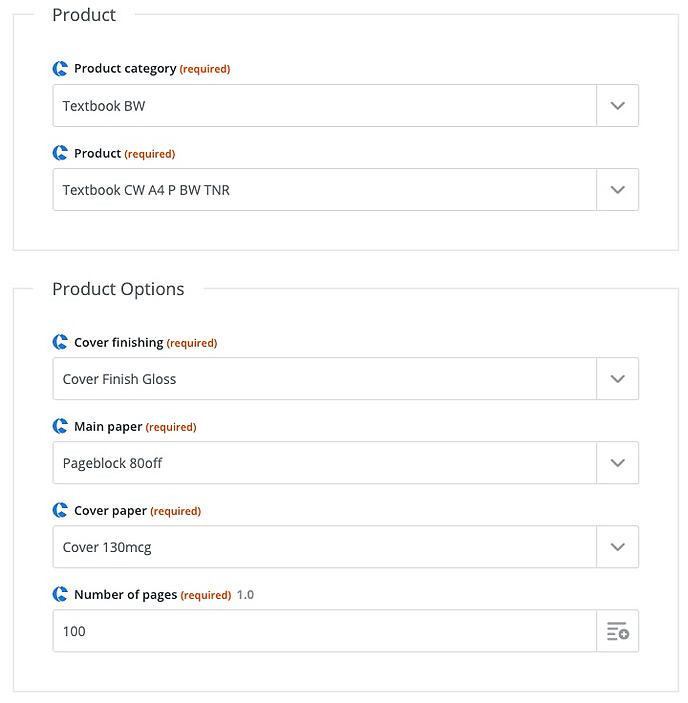 Shipping: You have two options here.
- Order Quotes that Cloudprinter.com provides are valid for 48 hours as prices may vary due to certain circumstances (e.g. fire at printing facility near yo, hence prints now need to travel further). In essence, this means that you can request an Order Quote today, but only place the actual order tomorrow. As the price tomorrow can be higher, you can now save on the printing costs by using the Order Quote that you made today. In this case, you will need to select Order quote below Shipping. In the next field, load the Quote Hash (it is possible to do this from a previous step in your Zap).
- If you haven't performed an Order Quote before, simply select Shipping level here and choose the shipping level of your choice in the next field.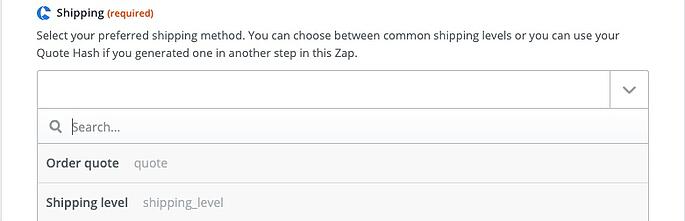
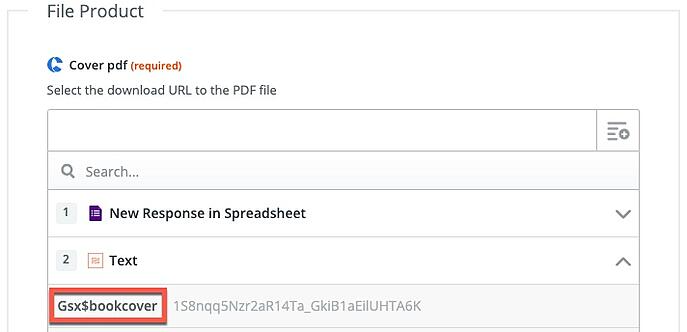
File Product:
Here you have to select the link to your PDF file in your folder, such that the Cloudprinter.com platform can access and download the file to check its content and forward it to a suitable print partner.
Below the Cover pdf you should copy-paste the following:
https://drive.google.com/uc?authuser=0&id={____ID____}&export=downloadWhere you need to replace ___ID___ by the ID as provided by our first formatter from Steps 8 - 14.
 Below the Book pdf you should copy-paste the following:
https://drive.google.com/uc?authuser=0&id={____ID____}&export=downloadWhere you need to replace ___ID___ with the ID as provided by our second formatter from Steps 8 - 14.
 Below Md5 of product pdf you should input the Md5 Checksum of your PDFs. These numbers are used for the validation of your files. As Google Forms does not provide Md5 Checksums, you can leave these fields empty.
The File Product field should now look like this.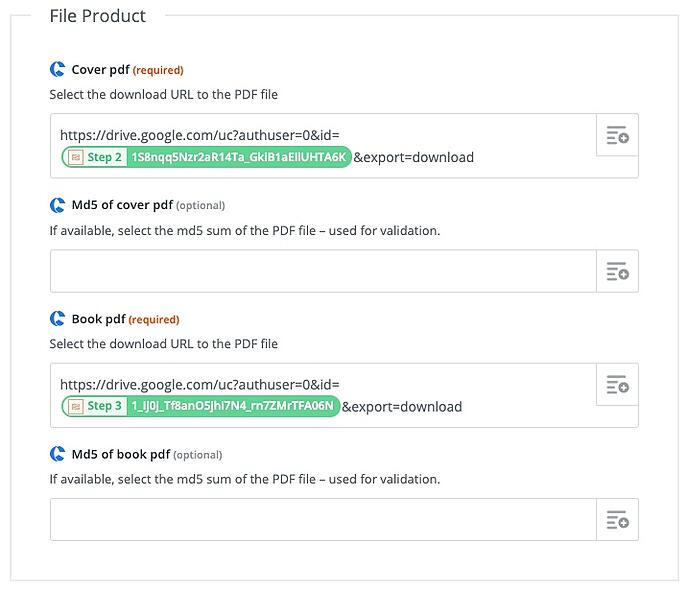
- Finished setting up your order details? Continue and name your zap as is most convenient and recognizable for you.
Well done! Your Zap is now finished and ready to be turned on!
- In your Home overview of Zapier, you will now find the Zap that we've just created. You can always go back to change whatever you like without the need of creating a new Zap, how nice is that?
So what's next? Each time you post a response in the Google Form that we created in Step 1 of this article, the PDFs will be uploaded to Cloudprinter.com and your order will be ordered as the product that you specified (as a textbook in this case). Moreover, the order will be sent to the delivery address that you specified in this Zap. All instantly and automatically, how easy!
We recommend using Google Forms for uploading orders that consist of more than one PDFs and if you expect to order the same type of product more than once.
